Nano Banana 2.1: Better Height Comparison Visuals
Nano Banana 2.1 can create full-body character illustrations, simplify an image for a lineup, and help develop the visual style of an infographic. If your goal is a height comparison, the most useful workflow combines that artwork with explicitly entered measurements.
Start with the heights you want to compare. Generate or edit each visual, check its framing, then place it in a chart using those values. This lets you improve the presentation while keeping the scale tied to data you can inspect.
This guide covers suitable prompts, a worked scale example, cropping mistakes, credit costs, and a practical route from an image idea to a shareable comparison. The charts below are calculated editorial examples, not Nano Banana outputs or screenshots of an exported project. The prompt templates are new and have not been generation-tested.
What Nano Banana 2.1 can contribute
Google's October 6, 2026 release notes describe Nano Banana 2.1 as an update to Nano Banana 2, with improvements to instruction following, image quality, text, and subject consistency. Those changes are relevant when you want several usable character assets or a clear infographic layout.
A quick distinction between the names helps when reading older tutorials:
- Nano Banana is the broader image-model family.
- Nano Banana 2 refers to Gemini 3.1 Flash Image, the predecessor.
- Nano Banana 2.1 is the updated image generation and editing model used in this guide.
- Nano Banana Pro refers to Gemini 3 Pro Image, a separate model option.
- Google Gemini is the wider Google AI product and model context, rather than the account system of every website offering an image interface.
You can prepare artwork in nano banana 2.1 through Text to Image or Image to Image. Its browser interface does not require your own API key. The website's credits are separate from a Google Gemini subscription.
For an accurate comparison, keep three decisions visible: the measurement assigned to each subject, the point on the subject that measurement describes, and the image region used to represent it.
Why an attractive generated chart can still be misleading
An image may say “180 cm” beside a figure without making that figure the correct height relative to its neighbor. Labels and geometry are two separate things to check.
Perspective creates another trap. A shorter character closer to the camera can look taller than a distant one. That can work in an illustration, but it prevents a direct height comparison.
Google's model card notes continuing limitations in spatial positioning, factuality, small text, and character consistency. For Nano Banana 2.1 height projects, the practical response is to construct the measured chart from known values and review the visual assets separately.
Consider three invented characters:
| Character | Assigned height | Difference from Mira |
|---|---|---|
| Mira | 160 cm | 0 cm |
| Rowan | 180 cm | +20 cm |
| Atlas | 200 cm | +40 cm |
At an illustrative scale of two pixels per centimeter, their vertical extents should be 320, 360, and 400 pixels. All three begin at the same baseline. Rowan is 12.5% taller than Mira, while Atlas is 25% taller.
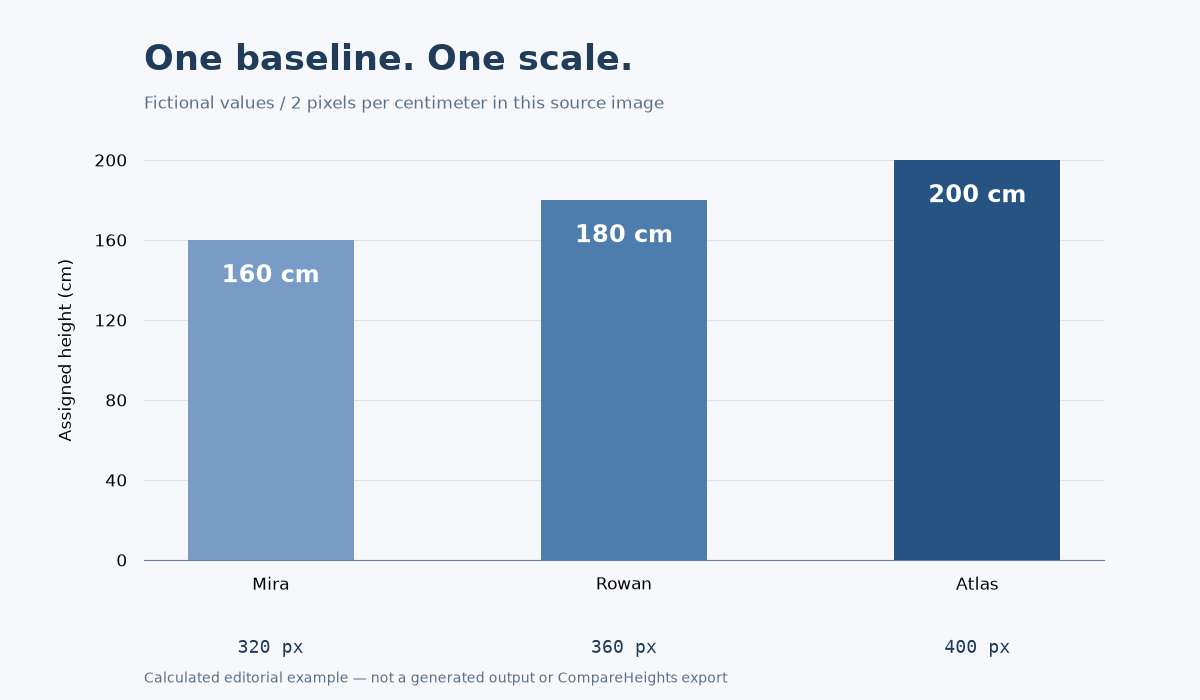
Calculated illustration using fictional values: 2 pixels per centimeter. These are not measured people, generated characters, or a CompareHeights export.
This arithmetic gives you a reference for judging the chart. If the labels are correct but all three figures look the same height, the comparison still needs correction.
Start with measurements and a definition of height
Before generating anything, decide what each number represents. For a standing person, it might be floor to the top of the head without shoes. For an animal, it could mean shoulder height rather than the highest point of its ears. For a building, the value might include an antenna or stop at the roof.
Use comparable definitions and label exceptions. A dinosaur's body length cannot be placed beside a person's standing height and described as the same measurement.
For fictional characters, explicitly assign a height or cite a reliable source for the chosen version. For real people, use a dated, credible source and avoid inferring precise measurements from a photograph. A chart can faithfully display an entered value while that value itself remains uncertain.
Record the names, numbers, units, and sources before image work begins. Nano Banana 2.1 is then helping you illustrate a defined comparison rather than deciding the measurements for you.
Create full-body assets with Nano Banana 2.1
A useful comparison asset has a complete outline, a neutral pose, and a clearly visible bottom point. A cinematic close-up usually needs more preparation because the feet or top of the subject may be missing.
Prompt 1: an original character for a lineup
Create a full-body illustration of one original character: [DESCRIPTION].
Show the character standing upright in a neutral front-facing pose,
with both feet on the same flat ground level and arms relaxed.
Include the complete head and both feet, with a small clear margin around them.
Use an eye-level view with minimal perspective distortion.
Preserve these identifying details: [HAIR], [CLOTHING], [COLORS], [FEATURES].
Use a plain, evenly lit background and a clean, readable outline.
No text, rulers, height labels, dramatic shadows, or additional characters.
Choose Text to Image and make an initial draft. For a tall subject, a portrait canvas can be more useful than squeezing it into a square. Choose among the aspect ratios actually available in the interface.
Keep the height value in your measurement record. Asking the model to make a single character “180 cm tall” cannot establish a measurable physical size in an isolated image. The chart assigns that scale later.
When using Nano Banana 2.1 for several assets, repeat the same framing instructions. Matching the visual medium, camera angle, and pose makes the eventual comparison easier to read.
Prompt 2: simplify an existing character image
Use the uploaded image as the identity reference.
Preserve the character's facial features, body proportions, hair,
clothing design, and colors.
Show one complete full-body character standing upright, facing forward,
with the feet at the same level and the entire head visible.
Replace the busy setting with a plain, evenly lit background.
Keep the outline unobstructed. Do not add text, measurement marks,
platforms, hats, or new accessories.
Upload the reference in nano banana 2.1 and select Image to Image. This prompt is a suggested edit, not a guarantee that a cropped photograph can be reconstructed accurately. Any newly generated, previously unseen body details are invented details.
If identity or pose drifts, reduce the requested changes. Background simplification and a new pose can be separate attempts. Keep the original reference so you can return to it rather than repeatedly editing a deteriorating result.
Crop the image to match the measurement
Empty space can distort a comparison even when the entered height is correct. Suppose a 1,000-pixel-tall image contains a character whose visible body occupies only 800 pixels. If you scale the whole image box to represent 180 cm, the visible body spans only 144 cm at that same scale.
The calculation is simple: 180 × 800 / 1000 = 144. The number beside the character might still say 180 cm, which is why this mistake is easy to miss.
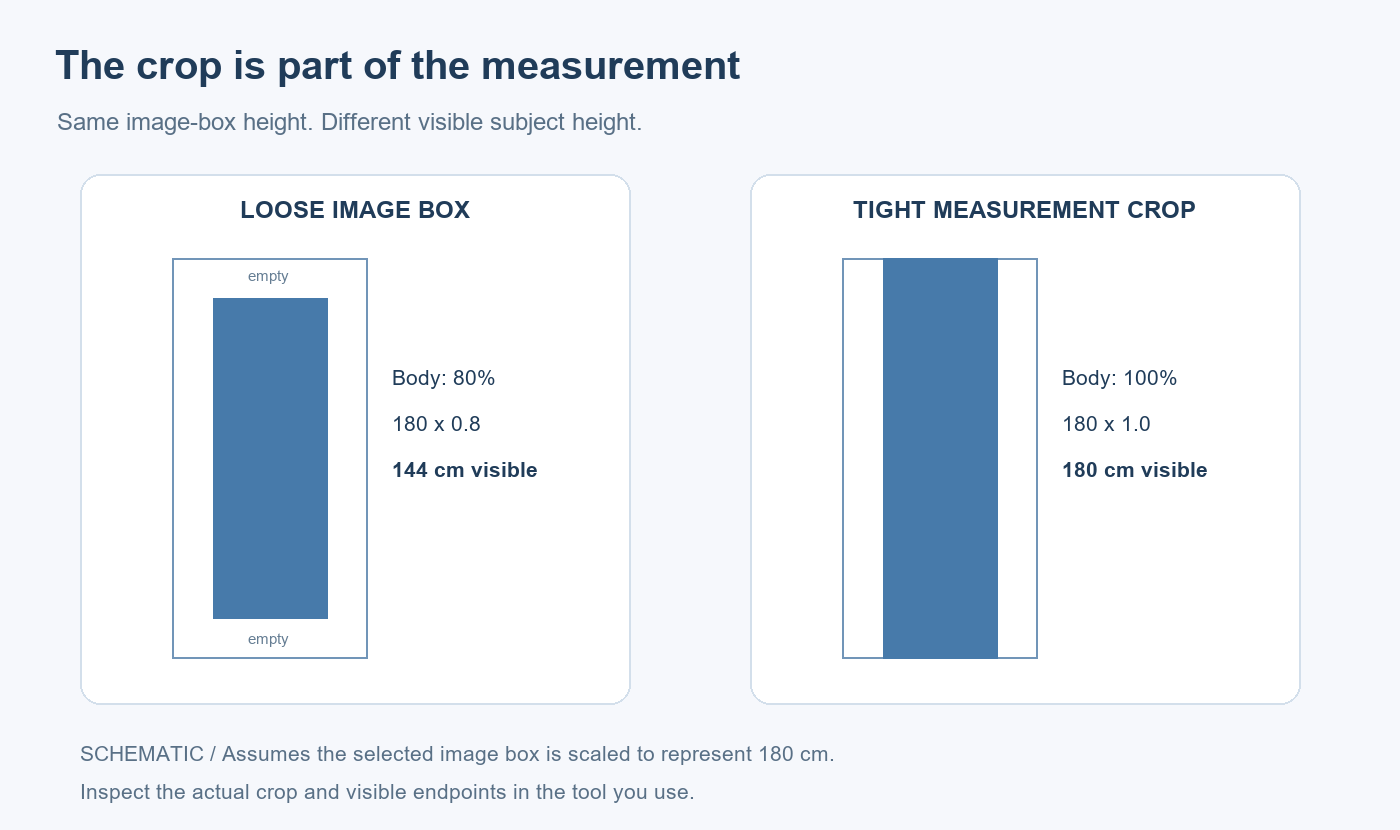
Schematic example of image-box scaling. Actual behavior depends on how the comparison tool uses the selected crop; inspect the final visible endpoints.
Crop away unnecessary space above and below the measured subject. Then check what counts as its top: hair, a hat, horns, or a raised hand can change the image bounds without changing the underlying measurement you intended to show.
A transparent background often makes the outline easier to place, but cropping and removing a background are different operations. PNG supports transparency; choosing PNG in Nano Banana 2.1 does not prove the generated file has an alpha channel. Check the actual file and remove the background separately if necessary.
For serious scale work, use a neutral silhouette whose measured endpoints are unambiguous. Keep more expressive character art as an accompanying illustration if its pose obscures the comparison.
Assemble the comparison in CompareHeights
Open the height comparison tool and choose library subjects or prepare your own images. For the custom-image route, the documented workflow is upload, crop, enter a name and height, and add the subject to the comparison.
Use your measurement record for each entry. The custom-character guide explains creating reusable characters and recommends full-body images. Account requirements and storage limits depend on the feature and current plan, so check the options shown in your session.
Once the subjects are placed, assess the chart as a reader would:
- Are all subjects aligned to a common baseline?
- Do the chosen crops represent the same measurement definitions?
- Are the units and names visible and unambiguous?
- Does the shortest-to-tallest order match the entered values?
- Does the export preserve readable labels at the intended display size?
CompareHeights documents PNG, JPG, and WebP export. Choose the format available for your project and inspect the saved file, especially after resizing it for a blog or social post.
For extreme differences, such as a person beside a skyscraper, consider separate detail and overview charts. Enlarging the person independently would make them easier to see but would break the shared scale. If you use an inset, identify it as a separate scale.
Use Nano Banana 2.1 for the surrounding design
Once the chart is correct, you may want a title area, a themed background, or a companion illustration. Generate those as separate assets so the measured chart can remain intact during composition.
Prompt 3: a background with room for a chart
Create a landscape editorial background for an article about [TOPIC].
Keep the central 70 percent as a plain, low-contrast area where a measured
comparison chart will be placed later.
Add subtle [THEME ELEMENTS] only around the outer edges.
Use [PALETTE] with restrained texture and even lighting.
Do not draw people, objects to be measured, axes, rulers, numbers, or text.
This is an untested design template. Add the exported chart as a separate layer in your design editor and preserve its aspect ratio. Scale the chart as a whole rather than stretching or resizing individual subjects.
Sending the completed chart back through generative editing can alter the labels, baseline, or relative sizes. If you do that for an artistic version, recheck the measurements and retain the original chart for readers who need the accurate comparison.
Costs, free credits, and resolution choices
The browser service's Nano Banana 2.1 rates checked on October 9, 2026 are 2 credits per 1K request, 3 per 2K request, and 4 per 4K request. New accounts start with 5 credits; that is an initial allowance, not a recurring daily grant.
Two 1K requests use 4 credits. Three separate 1K character assets use 6, before any retries. A single 4K request uses 4. Pick a small first task instead of assuming the starter balance covers a complete multi-character project.
Resolution describes output detail, not measurement reliability. Nano Banana 2.1 at 4K can still produce a poor pose or an incorrect label. Make the subject suitable for a comparison first, then decide whether its final placement needs more pixels.
The site charges credits independently of Google Gemini subscriptions. API token prices, website credits, and any CompareHeights plan limits are different billing systems and should be checked separately.
Comparing Nano Banana 2.1, Nano Banana 2, and Pro
For this task, evaluate models on usable assets: complete feet, a consistent pose, recognizable identity, a clean outline, and the number of revisions required. Nano Banana Pro may be another option to test, but its name alone does not tell you whether an image will fit a measured chart.
When comparing Nano Banana 2.1 with Nano Banana 2 or Nano Banana Pro, use the same brief and reference. Record which output actually passes those checks. The diagrams in this article do not constitute a model benchmark or a measured accuracy score.
Common questions before you export
Can Nano Banana 2.1 create a complete height chart directly?
You can request an infographic-style image, but inspect both text and proportions. For a comparison you intend readers to rely on, explicitly entered measurements and a common scale make the result easier to verify.
Can it determine someone's height from a photo?
A photograph alone usually lacks the calibrated distance, perspective, and reference information needed for a dependable measurement. Use a known height, then use the image to represent the person. Do not present a generated estimate as a measured fact.
What if the characters are standing differently?
A crouched or leaning figure cannot be compared directly to an upright one using visible image height alone. Use a consistent pose or explain that the image shows a pose rather than anatomical standing height.
Is there a video demonstration to watch?
Nano Banana 2.1 Is FINALLY Here (I Tested Everything) by Youri van Hofwegen offers supplementary image examples. It is not a height-measurement validation, and it is not the source of the calculated diagrams in this guide.
Make one asset, then check the whole path
Start with one full-body illustration in nano banana 2.1, prepare its crop, and assign a known or clearly fictional height. Add a second subject and confirm the relative sizes before expanding the chart.
That small exercise checks the entire process: a usable image, a defined measurement, a correct scale, and a readable export. Once those pieces agree, improving the visual design becomes much easier.
Updated October 9, 2026. Examples use fictional measurements and editorial diagrams. Prompt templates are untested; website rates and available controls may change.
Related resources
These guides and posts offer further reading on image-editing briefs, visual direction, and Nano Banana 2.1. Use them as creative references alongside the scale checks in this article:
- DEV Community: Treat Image Edits Like Testable Specs — a preserve/change/deliver framework with acceptance criteria for reviewing an edit.
- Medium: From a Product Photo to a New Visual Direction
- velog: Nano Banana 2.1 usage guide, from image generation to reference editing
- Nano Banana 2.1 guide on Google Sites
- Drew Grant's Nano Banana 2.1 introduction on LinkedIn — a creator's introduction to changing backgrounds, lighting, and composition for product images.
- Related submission on Hacker News